

If you’re completely new to this, the short version of this beginner’s guide to IPTV setup is: IPTV is just television delivered over the internet instead of cable or satellite, and setting it up means installing a player app and connecting it to a subscription from a licensed provider. Everything else — the terminology, the device choices, the settings — builds on that simple foundation.
This guide is written for people who haven’t done this before. Rather than jumping straight into technical steps, it starts with what IPTV actually is, walks through the terms you’ll run into, and explains how to evaluate a provider before you commit to one. If you’ve already got the basics down and just need device-specific installation steps, see our companion guide on [INTERNAL LINK: How to Set Up IPTV: Easy Step-by-Step Guide].
What Is IPTV, Really?
IPTV stands for Internet Protocol Television. Instead of receiving channels through a satellite dish, cable line, or antenna, your TV signal travels over your regular internet connection, the same way a video call or a webpage does. In practice, this means IPTV works through apps rather than physical tuners or set-top boxes tied to one company’s infrastructure.
It helps to understand that IPTV is a method of delivery, not a single product. Many mainstream services you already know use IPTV technology under the hood, including some official telecom TV packages. The technology itself is neutral; what matters for you as a viewer is whether the specific service you’re subscribing to has the legal right to distribute the content it offers.
Streaming vs. Cable vs. IPTV: How They Compare
If you’re coming from traditional cable or satellite, it helps to see IPTV positioned alongside the other options you already know:
| Delivery Method | How It Works | Typical Equipment |
|---|---|---|
| Cable/Satellite | Signal delivered via coaxial cable or satellite dish | Set-top box provided by your cable/satellite company |
| Mainstream streaming (SVOD) | On-demand and some live content over the internet | Smart TV or streaming device app |
| IPTV | Live channels and on-demand content over the internet | Any device running a compatible player app |
The main practical difference for a beginner is flexibility: IPTV isn’t tied to a single company’s hardware, so you can generally choose your own device and app, as long as they’re compatible with your provider’s connection method.
Key IPTV Terms Every Beginner Should Know
Before setting anything up, it helps to recognize a few terms you’ll see repeatedly:
| Term | What It Means |
|---|---|
| Player app | The software you install that displays and organizes your channels and content |
| Playlist / M3U | A file or link, based on the M3U format, that tells your player app which channels and streams are available |
| Xtream Codes | A common login-based method (server address, username, password) some providers use instead of a plain M3U link |
| EPG | Electronic Program Guide — the schedule of what’s airing now and next on each channel |
| VOD | Video on Demand — movies and shows you can watch anytime, separate from live channels |
| Catch-up TV | The ability to watch a program after it originally aired, if your provider supports it |
| Buffering | A temporary pause in playback while your device loads more data, usually caused by network issues |
The M3U playlist format itself isn’t unique to IPTV — it’s a general text-based playlist standard, and its streaming variant (M3U8) underpins Apple’s HTTP Live Streaming (HLS) protocol, documented in Apple’s official HLS developer documentation. Understanding this helps clarify that the format itself is just a technical container — it’s neutral, and what matters is the legitimacy of whoever is providing the content behind it.
What You’ll Need Before You Begin
- A device to run your player app on — a smart TV, streaming box, phone, tablet, or computer
- A reliable internet connection, since IPTV depends entirely on your bandwidth and connection stability
- A subscription with a legitimate, licensed IPTV provider, which supplies your playlist or login details
- A player app compatible with both your device and your provider’s connection method
Notice that the provider and the player app are two separate things. The app is just the interface; the provider is who actually supplies the content and is the party responsible for holding proper distribution rights.
How to Choose a Legitimate IPTV Provider
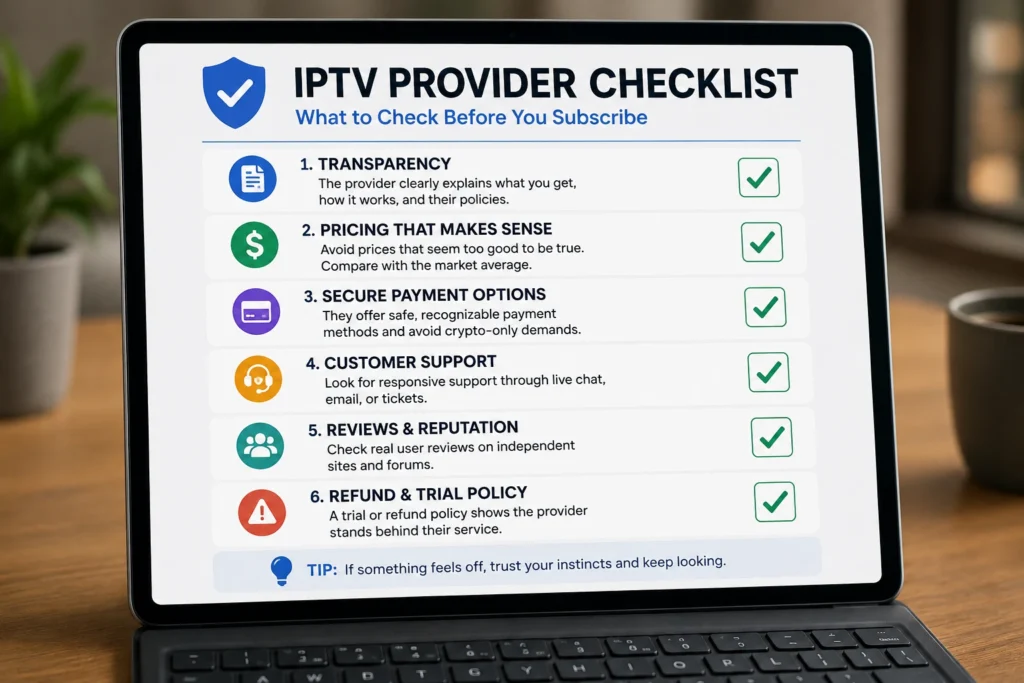
This is the step beginners most often skip, and it’s the one that matters most. A few practical signs separate a legitimate provider from a risky one:
- Transparency about content licensing. A legitimate provider can explain, at least generally, how it’s authorized to distribute what it offers.
- A real, identifiable business. Look for a company name, contact information, and terms of service — not just a Telegram channel or an anonymous reseller page.
- Reasonable pricing. An enormous channel bundle at a price far below any mainstream streaming service is a common warning sign, not a bargain.
- Clear billing practices. You should know exactly what you’re being charged, how to cancel, and what happens if you do.
- No pressure tactics. Be cautious of urgency-driven sales language, “limited-time lifetime deals,” or requests to pay through unconventional methods like gift cards or cryptocurrency only.
Several of these red flags overlap with general subscription scam warning signs described by the FTC’s consumer guidance on avoiding scams, which is worth a skim regardless of what kind of subscription you’re evaluating.
Beginner’s Guide to IPTV Setup: The Basic Process
Once you understand the terminology and have chosen a provider, the actual beginner’s guide to IPTV setup process follows the same general pattern no matter what device or app you use:
- Install a player app compatible with your device from an official app store.
- Open the app’s “Add Playlist” or “Add User” option.
- Enter the connection details your provider gave you — either an M3U playlist URL or an Xtream Codes-style login.
- Let the app load your channel list and EPG data. This can take a few minutes the first time.
- Test a few channels to confirm everything is working before considering setup finished.
For detailed, platform-specific instructions covering Android TV, Fire TV, Smart TVs, Apple devices, and computers, see our full guide on [INTERNAL LINK: How to Set Up IPTV: Easy Step-by-Step Guide].
How Much Should IPTV Cost as a Beginner?
Pricing varies widely, but it helps to have a general sense of what’s reasonable before you start comparing providers as part of this beginner’s guide to IPTV setup. Most legitimate providers price their plans somewhere in the range of mainstream streaming bundles rather than dramatically undercutting them, since real content licensing has real costs behind it. If a provider is offering thousands of channels, premium sports, and every major streaming library for a fraction of what any single mainstream service charges, that gap is worth questioning rather than treating as simply a great deal.
Common Beginner Mistakes to Avoid
- Choosing a provider based only on price. The cheapest option is often the least reliable, and in some cases, not legitimately licensed at all.
- Skipping the internet speed check. IPTV quality is only as good as your connection; test your speed before assuming a problem is the app’s fault.
- Ignoring app permissions. Especially on mobile devices, review what a new app is asking to access before installing it.
- Assuming all player apps work the same way. Some accept only M3U links, others only Xtream Codes logins — check compatibility with your provider before choosing an app.
- Not testing before fully committing. If your provider offers a short trial period, use it to confirm reliability before paying for a longer plan.
Common Problems and How to Fix Them
| Problem | Likely Cause | Fix |
|---|---|---|
| Playlist won’t load | Typo in the URL/login, or expired subscription | Re-check the details carefully, then contact your provider |
| Channels play but freeze often | Insufficient internet speed or Wi-Fi interference | Test your connection speed; switch to Ethernet if possible |
| No program guide (EPG) data | Provider-side EPG issue | This is almost always on the provider’s end, not the app |
| App won’t install on your device | Compatibility issue | Confirm your device type and OS version against the app’s requirements |
| Picture quality looks poor | Low stream bitrate or app quality settings | Check the app’s video quality settings, and confirm your provider offers HD/4K streams |
Tips for New IPTV Users
- Start with a short trial period if your provider offers one, rather than committing to a long-term plan immediately.
- Keep your provider’s connection details saved somewhere safe in case you need to reconfigure your app later.
- Use a wired connection for your main viewing device if buffering becomes a recurring issue; the Wi-Fi Alliance’s guidance on home network performance covers general troubleshooting if you’d rather stay wireless.
- Don’t be afraid to switch player apps if one doesn’t feel intuitive — most providers work with several different apps.
- Revisit our guide on [INTERNAL LINK: Best IPTV Apps for Android TV] once you’re comfortable with the basics and want to compare specific apps.
Frequently Asked Questions
1. Is IPTV legal?
IPTV is a legal, widely used delivery technology. Legality depends on whether the specific provider you subscribe to has proper rights to distribute the content it offers — the technology itself isn’t the issue.
2. Do I need special equipment for IPTV?
No special hardware is required. Any device that can run a compatible player app — a smart TV, streaming box, phone, tablet, or computer — will work.
3. What’s the difference between an M3U playlist and Xtream Codes?
Both are methods providers use to deliver your channel list to a player app. M3U is a simple playlist link, while Xtream Codes uses a server address plus a username and password. Not all apps support both formats.
4. How much internet speed do I need for IPTV?
Requirements vary by provider and video quality, but a stable connection with adequate headroom above your provider’s minimum recommendation is generally necessary, especially for HD or 4K streams.
5. Can I try IPTV before committing to a long-term plan?
Many legitimate providers offer short trial periods. Using one before committing is a reasonable way to judge reliability.
6. Why do I keep seeing “buffering” when I watch?
Buffering is usually caused by insufficient bandwidth, network congestion, or Wi-Fi interference rather than a problem with the app itself.
7. Is a VPN required to use IPTV?
No, a VPN isn’t a required part of setup. Some users choose to use one for general privacy reasons, similar to how they might for any other online service.
8. What should I do if a provider seems too good to be true? T
reat it with caution. Extremely low prices for enormous channel bundles, vague business information, and pressure-driven sales tactics are all signs worth taking seriously before you subscribe.
Final Thoughts
This beginner’s guide to IPTV setup covers the foundation everything else builds on: understanding what IPTV actually is, learning the handful of terms you’ll encounter, and knowing how to evaluate a provider before you commit. Once those basics feel comfortable, the technical side of installing an app and entering your connection details is genuinely straightforward.
Most people who feel intimidated by IPTV aren’t struggling with the technology itself — they’re unsure which provider to trust or which terms actually matter. Working through this beginner’s guide to IPTV setup step by step, rather than skipping straight to installation, is the difference between a smooth first experience and a frustrating one spent troubleshooting avoidable mistakes.