
If your Kodi setup is buffering, stuttering, or just feels sluggish, the fix usually isn’t your internet connection — it’s your configuration. Getting the Kodi best settings dialed in for video, audio, network, and cache can transform a choppy experience into smooth, reliable playback. This guide walks through every setting worth changing, in plain language, so you can optimize Kodi in under 20 minutes.
Kodi is a free, open-source media center application maintained by the XBMC Foundation, and it runs on nearly everything — Windows, macOS, Linux, Android, and Amazon Fire TV devices. But its default settings are conservative, designed to work reasonably on low-end hardware rather than to perform optimally on yours. That’s why manual tuning matters.
Table of Contents
Why Default Kodi Settings Aren’t Optimal
Kodi ships with settings meant to be compatible with the widest possible range of devices, from old Raspberry Pi boards to modern gaming PCs. That “safe for everyone” approach means:
- Cache sizes are often too small for high-bitrate content
- Hardware acceleration may not be enabled by default
- Audio passthrough settings frequently don’t match your receiver
- Video playback options aren’t tuned for your specific display
Adjusting these settings to match your actual hardware is the single biggest factor in eliminating buffering, audio sync issues, and stuttering.
1. Enable Hardware Acceleration
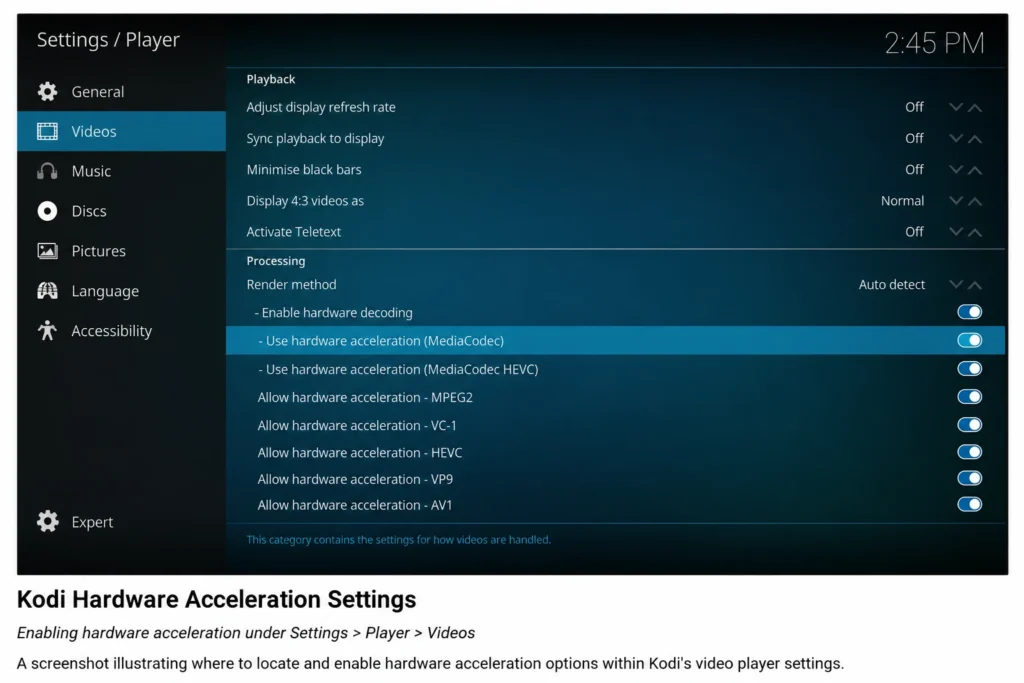
Hardware acceleration offloads video decoding to your device’s GPU instead of the CPU, which reduces stuttering — especially with 4K or HEVC (H.265) content.
How to enable it:
- Go to Settings > Player > Videos
- Turn on Allow hardware acceleration
- Enable Allow using DXVA2 (Windows), VDPAU/VAAPI (Linux), or the platform-appropriate decoder shown on your device
On Android-based devices like Fire TV or Nvidia Shield, hardware acceleration is typically enabled through MediaCodec and MediaCodec (Surface), which should stay on by default.
2. Adjust Cache Settings for Smoother Playback
One of the most impactful Kodi best settings changes involves the memory cache. A larger cache buffers more data ahead of playback, reducing the chance of interruptions on slower connections.
To adjust cache manually, you’ll need to edit the advancedsettings.xml file, since Kodi doesn’t expose full cache controls in the GUI by default. The official Kodi Wiki documents the correct syntax and safe value ranges for <cache> settings, including memorysize and readfactor.
A general guideline:
| Connection Type | Suggested Cache Size |
|---|---|
| Local network / NAS | 20–40 MB |
| Standard broadband | 80–120 MB |
| Slower or unstable connections | 150–250 MB |
Avoid setting cache values excessively high, as this can cause longer buffering pauses when the cache does empty, rather than fewer.
3. Fine-Tune Video Output Settings
Under Settings > System > Display, check that:
- Whitelist is enabled so Kodi automatically switches refresh rate to match your content (important for smooth 24fps movies on a 60Hz-capable TV)
- Adjust display refresh rate is set to “On start/stop” for the best balance of smoothness and speed
- Sync playback to display is enabled if your hardware supports it, which helps eliminate judder
4. Configure Audio Settings Correctly
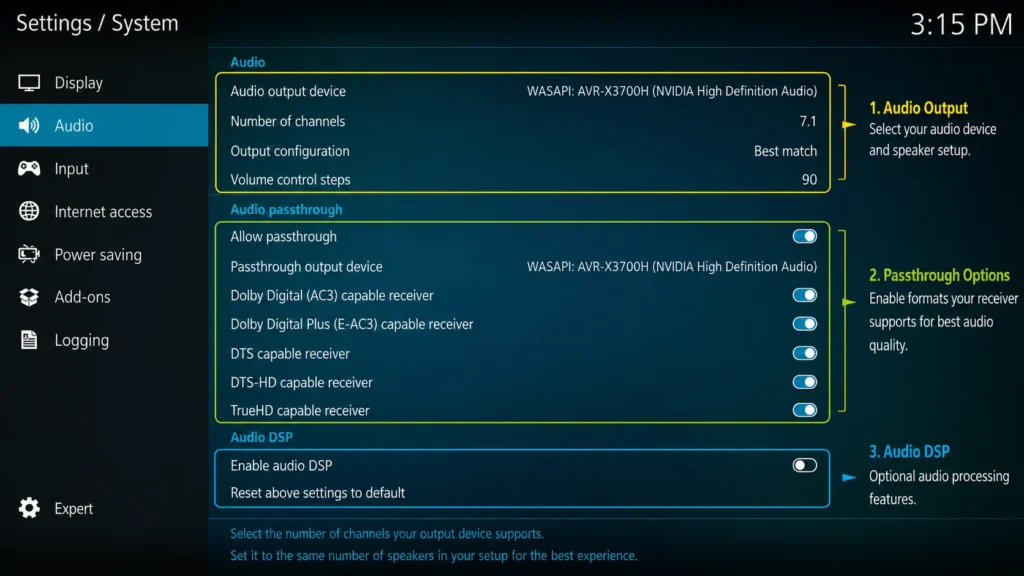
Mismatched audio settings are one of the most common causes of no sound, distorted sound, or sync issues. Go to Settings > System > Audio and confirm:
- Audio output device matches your actual output (HDMI, optical, analog)
- Number of channels matches your speaker setup (2.0, 5.1, 7.1)
- Passthrough is enabled only if your receiver supports Dolby Digital/DTS decoding — otherwise, leave it off and let Kodi handle decoding
If you’re unsure whether your AV receiver supports passthrough, check its manual or the manufacturer’s specification sheet before enabling this option, since forcing passthrough on unsupported hardware causes silent or garbled audio.
5. Set Up Subtitle Preferences
For consistent subtitle appearance across all your media:
- Go to Settings > Player > Language
- Set your preferred subtitle language
- Under Settings > Player > Subtitles, adjust font size, style, and background to match your screen size and viewing distance
This avoids having to manually adjust subtitles for every file you play.
6. Optimize Network Settings
Network configuration affects how Kodi communicates with local file shares (SMB/NFS) and how it behaves on your home network overall.
Under Settings > System > Internet Access, most users should leave settings on automatic unless troubleshooting a specific issue. If you’re streaming from a NAS or home server, using a wired Ethernet connection rather than Wi-Fi consistently produces more stable playback, particularly for high-bitrate 4K files.
7. Choose the Right Kodi Skin for Performance
While skins like Estuary (the default) are well-optimized, heavier third-party skins with animations and widgets can slow down navigation on lower-powered devices. If you’re running Kodi on older hardware:
- Stick with Estuary or a lightweight alternative
- Disable unnecessary home screen widgets under Settings > Skin > Layout
- Turn off RSS news feeds if you don’t use them, since they run background network requests
8. Manage Library and Database Settings
A bloated, unoptimized library database can slow down Kodi’s overall responsiveness. Periodically:
- Go to Settings > Media > Library
- Run Clean Library to remove entries for files that no longer exist
- Use Export Library to back up your data before major changes
This keeps browsing and searching fast, especially in large libraries.
9. Adjust File System and Buffering Options
Under Settings > Player > Videos, look for buffering-related toggles that affect how much data Kodi pre-loads before playback starts. Increasing pre-buffer time can reduce the odds of a mid-playback stall, at the cost of a slightly longer wait before content begins.
10. Keep Kodi and Add-ons Updated
Performance issues are sometimes simply bugs that have already been fixed in a newer release. The official Kodi download page always has the current stable version. Updating regularly ensures you benefit from decoder improvements, security patches, and bug fixes.
Only install add-ons from the official Kodi Add-on repository or other reputable, legal sources — this keeps your installation stable and secure.
11. Enable Debug Logging (For Troubleshooting Only)
If something still isn’t working after adjusting the above, Kodi’s debug log can pinpoint the cause. Enable it under Settings > System > Logging, reproduce the issue, then review the log file. The Kodi Wiki’s debug logging guide explains how to read and share logs correctly if you need community support on the official Kodi forums.
Quick Reference: Kodi Best Settings Checklist
| Setting Area | Recommended Action |
|---|---|
| Hardware acceleration | Enable in Settings > Player > Videos |
| Cache | Adjust via advancedsettings.xml based on connection speed |
| Display | Enable Whitelist + refresh rate matching |
| Audio | Match channels/passthrough to actual receiver |
| Subtitles | Set language and readable font size |
| Network | Prefer Ethernet for high-bitrate streaming |
| Skin | Use lightweight skin on older hardware |
| Library | Clean and export regularly |
| Updates | Keep Kodi and add-ons current |
Frequently Asked Questions
What are the best Kodi settings for 4K playback?
Enable hardware acceleration, confirm your device and cable support HDCP 2.2/2.3, and make sure “Adjust display refresh rate” is enabled so Kodi matches your content’s native frame rate.
Why does Kodi keep buffering even with fast internet?
Buffering is often caused by an undersized cache, Wi-Fi instability, or a source server that can’t sustain the required bitrate — not your overall internet speed. Adjusting cache settings and using Ethernet usually resolves it.
Should I enable audio passthrough in Kodi?
Only if your AV receiver or soundbar explicitly supports Dolby Digital or DTS decoding. If you’re unsure, leave passthrough off and let Kodi decode audio internally.
What is the ideal cache size for Kodi?
It depends on your connection and source. Local network streaming needs less (20–40 MB), while slower or less stable connections benefit from a larger cache (150–250 MB), configured through advancedsettings.xml.
Does changing the Kodi skin affect performance?
Yes. Heavier skins with widgets and animations can slow down navigation on older or lower-powered devices. Estuary, the default skin, is generally well-optimized.
How often should I clean my Kodi library?
Running Clean Library periodically — especially after removing or renaming files — helps keep browsing and searching fast and prevents database bloat.
Do I need to update Kodi regularly?
Yes. Updates from the official Kodi Foundation include performance improvements, decoder fixes, and security patches that directly affect playback quality.
Where can I find official Kodi add-ons safely?
The official Kodi Add-on repository, accessible from within the app or at kodi.tv/addons, is the safest and most reliable source for stable, well-maintained add-ons.
Final Thoughts
Getting the Kodi best settings right isn’t about one magic toggle — it’s a combination of hardware acceleration, proper cache sizing, correct audio configuration, and basic maintenance like keeping your library clean and your software updated. Work through the checklist above one section at a time, test playback after each change, and you’ll have a noticeably smoother, more reliable Kodi experience.